
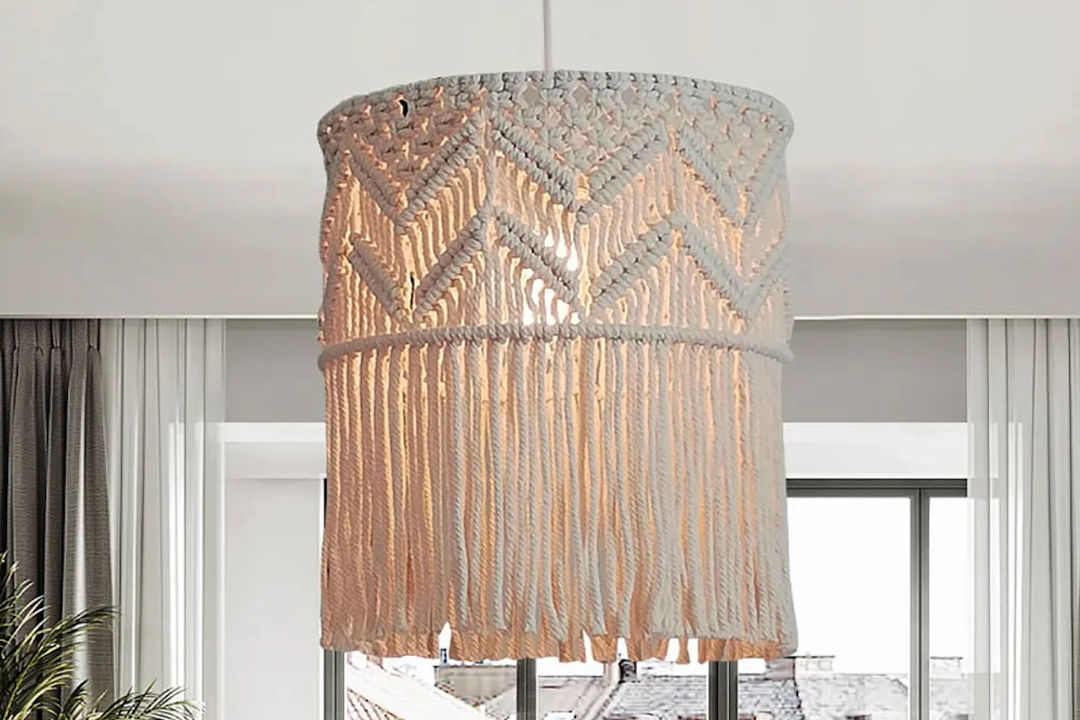
Want to add a touch of warmth and handmade charm to your home? A macrame lantern is a fantastic way to do just that. They’re not just pretty; they’re surprisingly approachable to make yourself, and they cast a really lovely, diffused light that creates a super cozy atmosphere. Think soft shadows dancing on your walls, a gentle glow that invites relaxation – that’s the magic of a macrame lantern.
Macrame’s inherent texture is key here. Those knots and loops aren’t just decorative; they catch and scatter light Lamp24 in a unique way. Unlike a plain glass or metal shade that might cast harsh beams, macrame diffuses the light, softening it and creating a much more ambient and inviting feel. It’s that tactile quality, the way the fibers interact with light, that makes them so special.
The ‘Cozy’ Factor: More Than Just Light
It’s easy to say a macrame lantern is “cozy,” but what does that actually mean in practical terms? It’s about the feeling of warmth and comfort it evokes. This comes from a few things:
- Softened Light: As mentioned, macrame breaks up direct light. This is crucial for creating a relaxing environment, especially in the evening. Harsh overhead lights can feel sterile; a macrame lantern provides a gentle alternative.
- Natural Materials: Most macrame is made from cotton or jute, natural fibers that inherently feel more grounded and organic. This connection to nature contributes to a feeling of calm and well-being.
- Handmade Charm: When you make something yourself, it carries a certain energy. Even if your knots aren’t perfectly uniform, there’s an undeniable authenticity that plastic or mass-produced items just can’t replicate. This personal touch adds to the feeling of your space being “lived-in” and loved.
Beyond the Basics: Lighting Options
When we talk about a macrame lantern, we often picture it with a candle inside. And yes, that’s a classic and beautiful option. However, you’ve got more flexibility than you might think, and each option offers a slightly different vibe.
Candle-Powered Ambiance
Using a real candle (safely!) in a macrame lantern is arguably the most traditional approach. The flickering flame adds a dynamic, almost mesmerizing quality to the light.
- Real Flame Considerations: If you go the real candle route, safety is paramount. You’ll need to ensure there’s adequate clearance between the flame and the macrame fibers. This usually means using a lantern frame that has a sufficient internal space, or using a container for the candle (like a glass jar) within the macrame. Never leave a burning candle unattended.
- Type of Candle: Tea lights are a popular choice for smaller lanterns, offering a gentle glow. Taller pillar candles can also work in larger setups, providing a more substantial light source. Scented candles can add another layer of sensory experience, enhancing the cozy atmosphere.
- Best Spaces for Candles: Areas where you can easily supervise the flame are ideal, like a dining table during a meal or a side table in a living room for ambient light.
Battery-Operated Alternatives
For a more worry-free option, battery-operated LED candles are a fantastic choice. They mimic the flicker of real candles without the fire hazard.
- Safety First, Always: This is the biggest win for battery-operated LEDs. You don’t have to constantly worry about leaving a flame unattended, making them perfect for busy households or places where little hands might be tempted.
- Variety of Styles: You can find LED candles in all sorts of sizes and with different flicker patterns. Some even have a remote control, which is a nice bonus for turning them on and off without disturbing the macrame.
- Ideal for Any Room: Because they’re safe, you can place them just about anywhere – shelves, bedrooms, even in a child’s room (under supervision, of course).
String Lights for a Magical Glow
Another popular and incredibly effective way to illuminate a macrame lantern is with string lights. This creates a different, often more ethereal, glow.
- Fairy Lights Perfection: Small, delicate fairy lights (often on a thin wire) are perfect for weaving into macrame. They distribute light evenly and can create a truly magical effect.
- Plug-in vs. Battery: Similar to LED candles, you can choose between plug-in fairy lights or battery-operated ones. Plug-in offers continuous light, while battery-operated gives you more placement freedom.
- Creating a Starry Effect: When the lantern is illuminated with string lights, the pattern of the macrame can create constellations of light on your walls, adding a dreamy quality to the room.
Getting Started: Tools and Materials
The good news is that you don’t need a professional studio to start making macrame lanterns. Most of the supplies are readily available at craft stores, and many people already have some of the basic tools at home.
The Core Components: Macrame Cord and Lantern Frame
These are your two main building blocks. Getting the right type and size of each will set you up for success.
Choosing Your Macrame Cord
The type of cord you use significantly impacts the look and feel of your finished lantern.
- Cotton Cord: This is the most popular choice for macrame. It’s soft, easy to work with, and comes in a huge range of colors and thicknesses. For lanterns, a 3mm or 4mm cotton cord is a good starting point – it’s substantial enough to create nice knots but not so thick that it becomes cumbersome.
- Single Strand vs. Twisted: Single strand cotton is softer and gives a fluffier look. Twisted cord is more durable and has a crisper appearance.
- Jute Twine: If you’re going for a more rustic, bohemian vibe, jute is an excellent option. It has a natural, earthy feel and a lovely rough texture. Be aware that jute can be a bit stiffer and can shed fibers.
- Other Materials: While less common for beginners, you can also experiment with linen or even synthetic cords for different textures and durability.
Selecting Your Lantern Frame
The frame provides the structure for your macrame design.
- Wire Frames: These are very common and come in various shapes – spheres, cylinders, geometric forms. They’re lightweight and easy to wrap macrame around. You can find these at craft stores or even repurpose old lampshade frames.
- Glass or Metal Jars/Lanterns: You can also use existing glass jars or metal lanterns as a base. The macrame then acts as a decorative sleeve around the existing container. This is a great way to upcycle!
- Hoops: Wooden or metal hoops can be used as the top and bottom edges of a cylindrical lantern, with macrame hung between them.
Essential Tools for Macrame
Beyond the cord and frame, a few handy tools will make your macrame journey smoother.
- Scissors: A good, sharp pair of scissors is non-negotiable. You’ll be cutting a lot of cord!
- Measuring Tape or Ruler: Precision comes in handy when cutting your cords to length.
- S-Hook or Clamp: Something to hang your frame from is incredibly useful. An S-hook screwed into a ceiling beam or a sturdy clamp attached to a table works well. This allows you to work on your macrame from all sides without the frame moving too much.
- Comb or Brush: For adding a fringe or a softer texture to your macrame, a comb or even a sturdy brush can be used to unravel the cord.
- Notions Bag (Optional): Keeping your smaller tools organized in a little bag can be helpful.
Mastering the Knots: Your Macrame Toolkit
You don’t need a thousand different knots to make a fantastic macrame lantern. A few core knots will get you a long way and allow for a lot of creative variation.
The Foundation: Lark’s Head Knot
This is often the very first knot you’ll learn in macrame, and it’s crucial for attaching your cords to your frame.
- How it Works: Fold a cord in half. Place the loop over the frame, then pull the two loose ends through the loop. This secures the cord to the frame and creates two working strands.
- Versatility: Once attached, you can use these two strands for subsequent knots. It’s the starting point for so many designs.
The Workhorse: Square Knot (and its Variations)
The square knot is the bread and butter of macrame. It’s simple, creates a beautiful, flat pattern, and is incredibly versatile.
- The Basic Square Knot: Form a “4” shape with one working cord (the left cord), passing it over the two filler cords. Then, bring the right working cord over the tail of the left cord and up through the loop created by the “4”. Pull tight. Then, reverse the process: make a backward “4” with the right cord, passing it over the filler cords. Bring the left cord over the tail of the right cord and up through its loop. Pull tight.
- Creating Patterns: By repeating the basic square knot, you create a flat, woven effect.
- Half Square Knot: Doing only the first half of the square knot creates a spiral pattern. This is a simple way to add visual interest.
- Alternating Square Knots: When you string rows of square knots together, slightly offsetting them creates a more intricate, diamond-like pattern. This is where you can really start to build texture and visual appeal into your lantern.
Adding Depth: Half Hitch Knot (and Spiral/Diagonal Hitch)
Half hitch knots are excellent for creating lines, borders, and intricate patterns.
- The Simple Half Hitch: This knot is made by wrapping a working cord around a filler cord and pulling it through the loop created. You can make them go in one direction consistently.
- The Spiral Hitch: Similar to the half square knot, when you only use half hitches and always start them on the same side, you’ll naturally create a spiral. This is a very effective knot for creating continuous, flowing patterns.
- The Diagonal Hitch: By changing the direction of your half hitches, you can create diagonal lines and chevron patterns. This is how you can build more complex geometric designs into your macrame.
Designing Your Unique Macrame Lantern
This is where your personal style comes in. Don’t be afraid to experiment and adapt existing patterns to your vision.
Planning Your Design: Sketching and Proportions
Before you even pick up a piece of cord, take a moment to plan.
- Visualize the Shape: What kind of lantern are you aiming for? A perfectly round sphere? A more elongated cylinder? A geometric, angular shape?
- Consider the Frame: Your frame will dictate the overall structure. Is it open at the top and bottom, or does it have a solid base? This impacts how you can attach and finish your macrame.
- Sketch it Out: A simple drawing can help you visualize how your knots will fall and where you might want to add embellishments. You don’t need to be an artist; just a rough idea is fine.
- Think About Cord Length: This is a big one. Longer is generally better when starting out, as you can always trim excess. As a rough guideline, you might start by cutting cords about 4-8 times the desired length of your finished project. This varies greatly depending on the knots used and the density of your design, so it’s best to err on the side of caution.
Incorporating Different Textures and Patterns
This is where a macrame lantern truly shines. Mixing knot types and patterns adds visual interest.
- Alternating Panels: You could have a section of square knots, followed by a section of spiral knots, and then perhaps some fringe. This creates dynamic contrast.
- Diagonal Lines: Using diagonal half hitches to create V-shapes or diamond patterns can add a classic macrame look. These can be used to break up larger areas of knotting.
- Creating Gaps: Deliberately leaving spaces between rows of knots can create a more open, airy feel. This also allows more light to escape, making it a good choice for brighter accents.
- Adding Beads or Charms: Small wooden beads, metal charms, or even small shells can be incorporated into your design by threading them onto the filler cords before knotting. This adds a touch of personalization and extra visual detail.
Finishing Touches: The Bottom and Top Details
How you finish the top and bottom of your lantern is just as important as the body.
- The Bottom Edge:
- Fringe: This is a classic macrame finish. You can trim the fringe to be even, or you can leave it varying lengths for a more wild look. You can also unravel the ends of the cords with a comb for a softer, feathery fringe.
- Braided Edge: You can braid together groups of cords to create a tidy, decorative edge.
- Knotted Edge: Simple gathering knots (like a gathering knot made with a separate piece of cord around the bundle of cords) can provide a clean finish.
- The Top Attachment:
- Loop for Hanging: A simple loop can be formed with the initial Lark’s Head knots, or you can create a more elaborate braided or knotted loop for hanging.
- Securing to a Hoop: If your design uses a top hoop, you’ll secure the macrame directly to this hoop.
- Integrating with the Light Source: If you’re using a frame with a light bulb socket, you’ll need to ensure your macrame is securely attached and doesn’t obstruct the bulb or wiring.
Step-by-Step Practical Guide to Making a Simple Lantern
Let’s break down how to make a basic macrame lantern. This is a good starting point for beginners, and you can adapt it as you gain confidence.
Step 1: Prepare Your Cords and Frame
- Measure and Cut: Based on the size of your frame, cut your macrame cord. For a medium-sized spherical lantern, you might start with 16-24 cords, each cut to about 6-8 feet (roughly 2-2.5 meters). It’s always better to have too much than too little.
- Attach to Frame: Using the Lark’s Head knot, attach each cord to your lantern frame. If you have a spherical frame, you’ll typically space them evenly around the widest part. If it’s a cylindrical frame, you’ll attach them along the top or bottom edge.
Step 2: Creating the Main Body (Rows of Knots)
This is where you’ll spend most of your time.
- Work in Sections: It’s easier to manage your cords if you work in sections rather than trying to knot all of them at once. Group your cords into manageable sections (e.g., groups of 4 cords for square knots).
- Alternating Square Knots: Start by making alternating square knots with your groups of 4 cords. Work from top to bottom, or in rows, depending on your design.
- Creating the Structure: As you work downwards, the macrame will start to form the shape of your lantern. You’ll be pulling the knots snug against the frame.
- Adding Diagonal Patterns (Optional): Once you have a few rows of square knots, you can begin incorporating diagonal half hitches to create V-shapes or diamond patterns. This involves using cords from adjacent square knots to create new diagonal lines.
- Spacing is Key: Pay attention to the spacing between your rows of knots. This will affect the overall density of the macrame and how much light can pass through.
Step 3: Shaping and Adjusting as You Go
Macrame is an organic process. Don’t be afraid to adjust.
- Pinch and Pull: As you knot, periodically pinch the macrame together and pull it gently to help it take shape.
- Check for Symmetry: If you’re aiming for a symmetrical design, periodically step back and check that your knotting is even on all sides.
- Addressing Gaps: If you notice any unsightly gaps forming, you can often adjust your knotting to close them or use smaller knots to fill them in.
Step 4: Finishing the Edges and Adding Embellishments
Once you’ve reached the desired length or shape:
- The Bottom:
- Fringe: Trim remaining cords to your desired fringe length. If desired, unravel the cords with a comb for a softer look.
- Gathering Knot: Gather the remaining cords together and Secure with a gathering knot, then trim.
- The Top:
- Final Knots: Ensure the top edge is securely attached to the frame. You might add a few final knots to reinforce this.
- Hanging Loop: Create a sturdy loop for hanging. This can be braided from the macrame cords themselves or made from a separate piece of cord.
Step 5: Adding Your Light Source
This is the final, magical step.
- Insert LED Candle or String Lights: Carefully place your chosen light source inside the macrame lantern.
- Test and Admire: Turn on your light and enjoy the beautiful, cozy glow!
Beyond the Basics: Advanced Techniques and Creative Ideas
Once you’ve mastered a basic lantern, the possibilities really open up. Don’t shy away from trying new things.
Experimenting with Color and Material Combinations
Who says macrame has to be just one color?
- Color Blocking: Use different colored cords for different sections of your lantern to create a graphic, modern look. You could have a solid color at the top, a contrasting color in the middle, and another at the bottom.
- Varying Cord Thickness: Mix thicker cords with thinner cords within the same design. This can create subtle shifts in texture and visual weight.
- Incorporating Other Fibers: Blend macrame cord with small strands of yarn or even ribbon for unique textural effects. Be mindful of fire safety if mixing different materials.
Creating More Complex Shapes and Structures
Move beyond simple spheres and cylinders.
- Geometric Designs: Use your knotting skills to create more angular, geometric lanterns. This might involve using more precise measurements and planning for sharp corners.
- Layering: Create a lantern with an inner and outer layer of macrame. This adds depth and can create interesting shadow play.
- Combining Macrame with Other Materials: Integrate your macrame with wood pieces, metal findings, or even delicate branches for a mixed-media effect. For example, you could suspend a macrame “cage” from a wooden base.
Incorporating Natural Elements
Bring the outdoors in with your macrame designs.
- Driftwood Bases: Use pieces of beautifully shaped driftwood as the base or top of your lantern.
- Feathers and Dried Botanicals: Weave found objects like feathers, dried flowers, or small shells into your macrame design. Ensure they are fire-retardant or placed well away from any heat source if using a real candle.
- Vine Wraps: Integrate natural vines or thin branches into the structure of your lantern for an organic, woodland feel.
Upscaling and Customization for Different Spaces
Think about where your lantern will live.
- Large Statement Pieces: For a grand entrance or a spacious living room, create a larger, more elaborate lantern.
- Muti-Lantern Arrangements: Group several smaller macrame lanterns of varying sizes and shapes together for a visually dynamic display.
- Seasonal Decor: Adapt your macrame designs for holidays. Think autumnal colors and textures, or a lighter, more airy design for summer. You could even add subtle themed charms.
- Outdoor Use (with Caution): While macrame is best kept indoors to protect it from the elements, you can create more weather-resistant versions using synthetic cords or by applying a sealant. Always bring them inside during inclement weather.
Caring for Your Macrame Lantern
To keep your creation looking its best:
- Dusting: A gentle dusting with a soft brush or a microfiber cloth is usually sufficient.
- Spot Cleaning: For minor spills or marks, use a damp cloth with a very mild soap solution. Blot gently and allow to air dry completely. Avoid soaking the macrame.
- Sunlight: Prolonged exposure to direct sunlight can cause some macrame cords to fade over time. Consider placing your lantern away from direct sunlight if this is a concern.
Making a macrame lantern is a rewarding process that combines creativity, practical skill, and the joy of handmade decor. It’s a fantastic way to infuse your home with warmth, personality, and that instantly cozy, inviting vibe. So, gather your supplies, unknot your creativity, and get ready to illuminate your space in a truly special way.


+ There are no comments
Add yours